
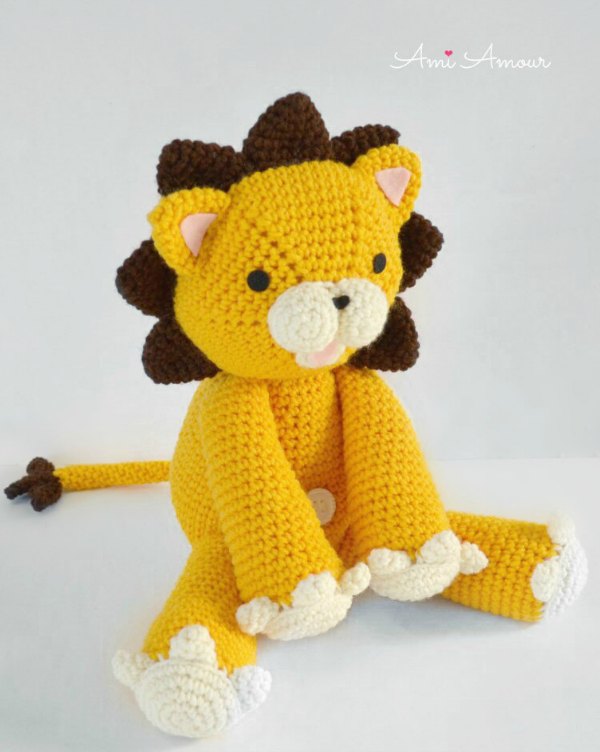
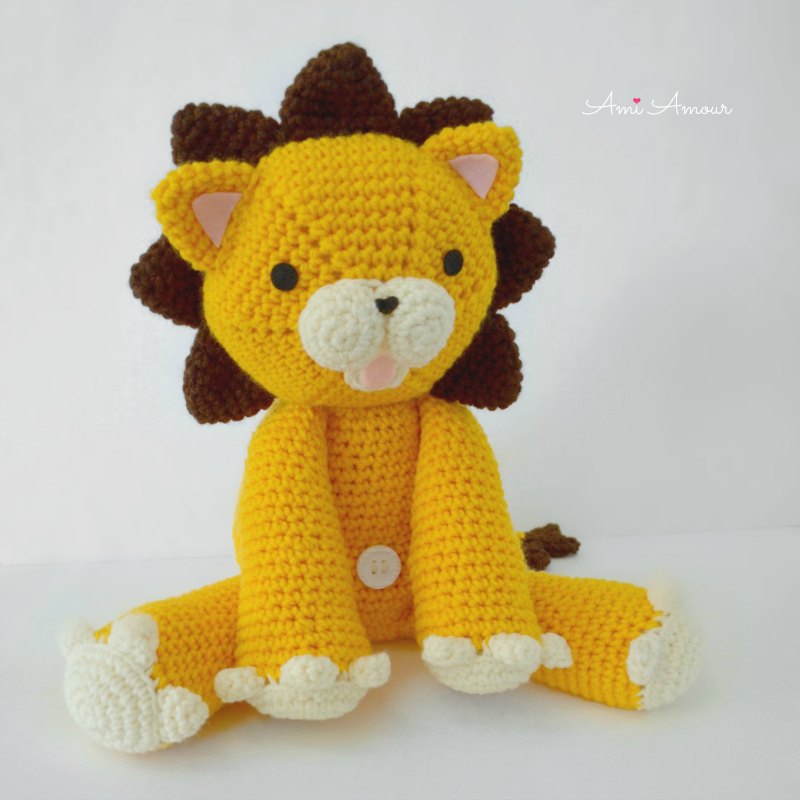
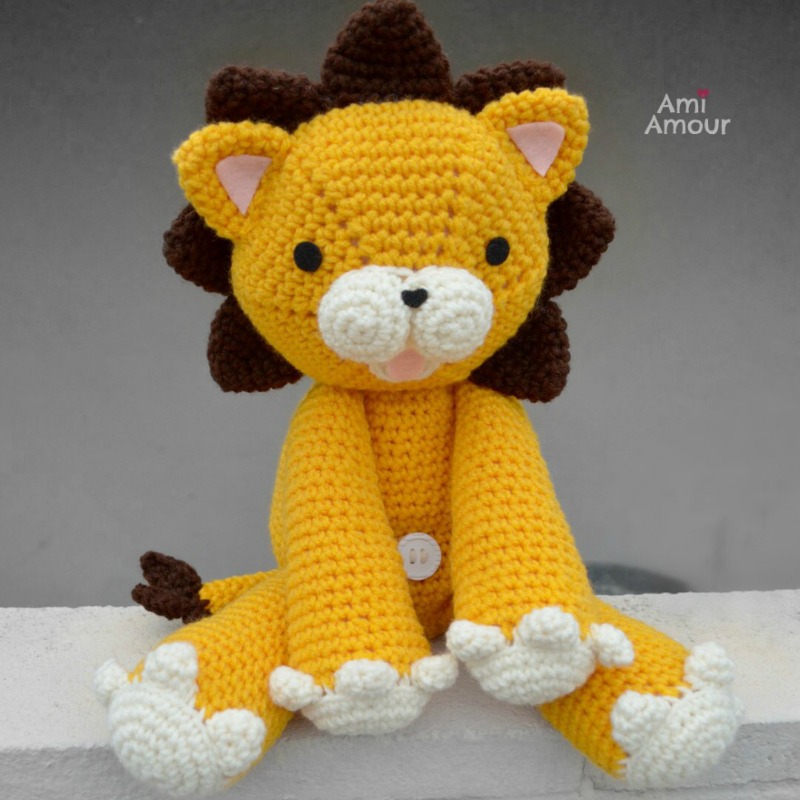
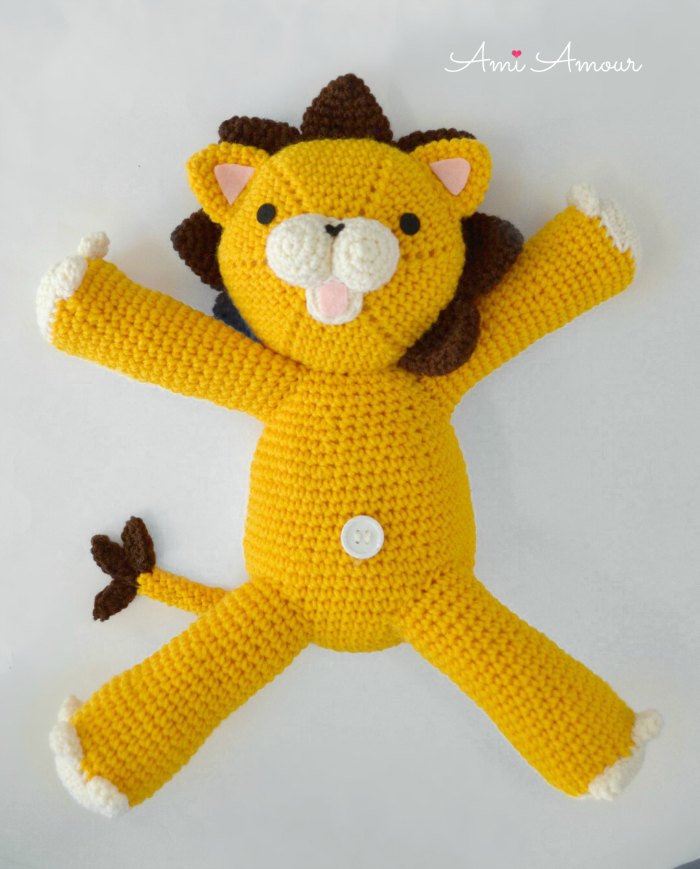
Here’s a cute and free crochet lion amigurumi pattern that I’d like to share with you guys. It’s one of my more larger sized amigurumi, which I always find fun to make because they’re the “pawfect” size for squeezing and cuddling.
Not too big, which makes crocheting seem a bit overwhelming, and also not too small, in which case it’s a bit difficult to give a good hug.
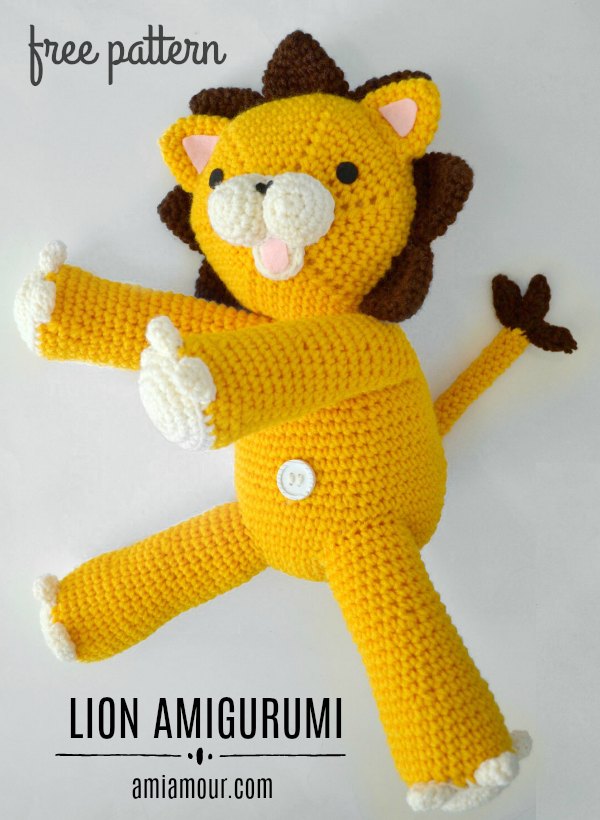
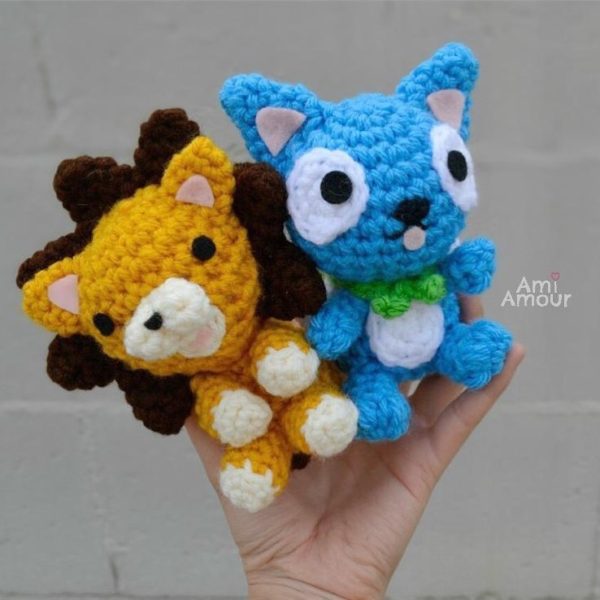
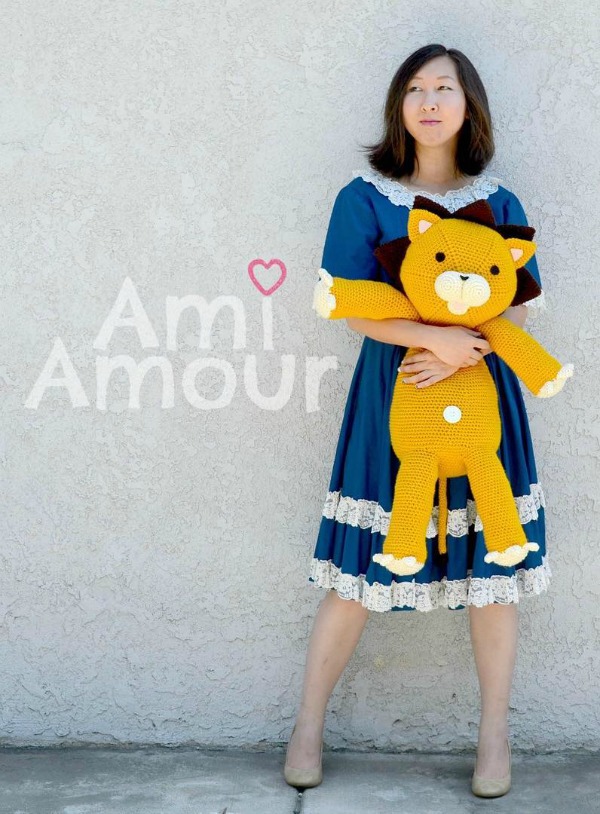
This is a crochet lion amigurumi pattern that was in part inspired by the character Kon from the anime Bleach. I’ve actually made many different versions, including a chibi/small size, and even a GIANT sized version!
This free pattern is the MEDIUM SIZE version.
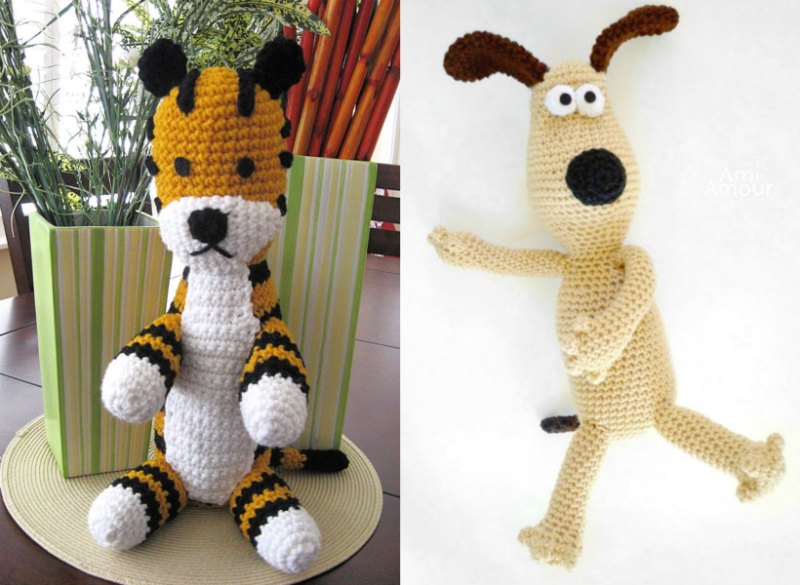
Here is my chibi version of Kon amigurumi along with Happy!
And this is my Giant Version! If you’d like to crochet this huge version, you can find the pattern here.
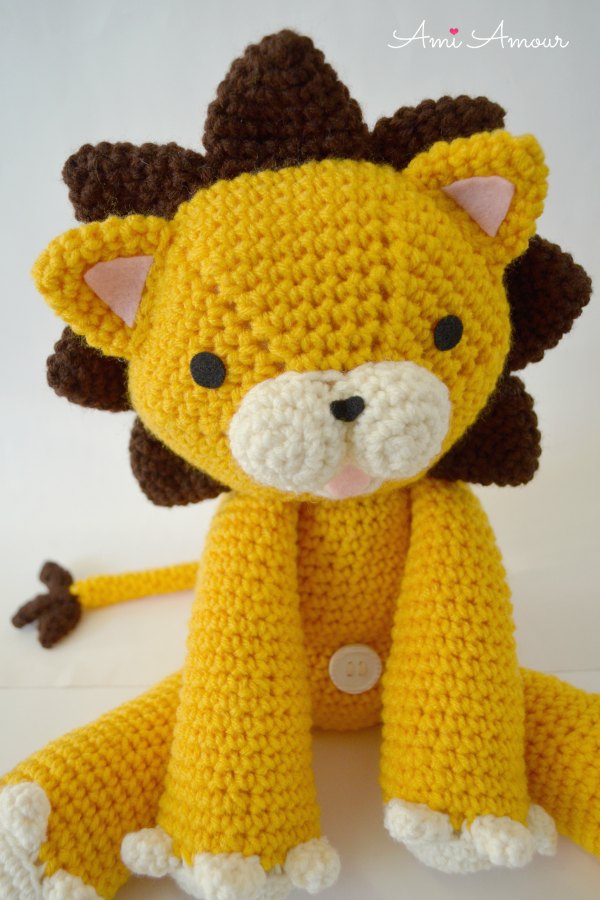
For the MEDIUM SIZE Crochet Lion, the doll sits at about 14 inches high. And, if you measure from mane to toe, my finished amigurumi lion was approximately 18 inches in length.
His features include a spiky mane, a cute snout, long limbs with claws, and also a button for its belly. He’s created in a nice golden color to evoke the tawny color of lions.
Hope you guys have fun creating your Crochet Lion and if you do, be sure to share your projects with me and tag me on Instagram and Facebook. I’d love to see!
Also don’t forget to subscribe to my blog to get all my latest pattern updates!
If you like this pattern, you may also enjoy these other free patterns:
1. Hobbes Crochet Pattern / 2. Gromit Crochet Pattern
Disclosure: This post contains affiliate links. This means I may receive a small commission if you decide to purchase anything by clicking on one of these links. There is no extra cost to you and it helps me keep creating free content and patterns for you guys on this blog. Thank you for your support!
Crochet Lion Amigurumi Pattern
CROCHET HOOK: 5.0mm hook
YARN:
Red Heart Super Saver – worsted weight, acrylic
– Saffron or Gold
– Coffee
– Aran
NOTIONS:
– Polyster Fiberfill
– Yarn Needle
– Stitch Marker
– Scissors
– Black and Pink Felt
– 25mm White Button, 4 hole (optional)
– Fabri-tac Glue
ABBREVIATIONS: (American English crochet)
ch – chain
dc – double crochet
hdc – half double crochet
sc – single crochet
sl st – slip stitch
sc2tog – single crochet 2 together (sc dec)
st – stitch
APPROXIMATE SIZE of Crochet Lion:
14 in/35cm tall sitting; 18 in/46cm length from mane to feet
HEAD
With gold yarn
Round 1: 6 sc into magic ring.
Round 2: 2 sc in each st around – 12 sc.
Round 3: [2 sc in next st, sc in next st] around – 18 sc.
Round 4: [2 sc in next st, sc in next 2 st] around – 24 sc.
Round 5: [2 sc in next st, sc in next 3 st] around – 30 sc.
Round 6: [2 sc in next st, sc in next 4 st] around – 36 sc.
Round 7: [2 sc in next st, sc in next 5 st] around – 42 sc.
Round 8: [2 sc in next st, sc in next 6 st] around – 48 sc.
Round 9: [2 sc in next st, sc in next 7 st] around – 54 sc.
Round 10: [2 sc in next st, sc in next 8 st] around – 60 sc.
Round 11-15: Sc in each st around.
Round 16: [Sc2tog, sc in next 8 st] around – 54 sc.
Round 17: [Sc2tog, sc in next 7 st] around – 48 sc.
Round 18: [Sc2tog, sc in next 6 st] around – 42 sc.
Round 19: [Sc2tog, sc in next 5 st] around – 36 sc.
Round 20: [Sc2tog, sc in next 4 st] around – 30 sc.
Round 21: [Sc2tog, sc in next 3 st] around – 24 sc.
Round 22: [Sc2tog, sc in next 2 st] around – 18 sc.
Round 23: [Sc2tog, sc in next st] around – 12 sc.
Fasten off. Stuff head.
MOUTH
With aran yarn
Round 1: 6 sc into magic ring.
Round 2: 2 sc in each st around – 12 sc.
Round 3: 2 hdc in next 2 st, hdc in next st, sl st in next st.
Fasten off, leaving a long tail.
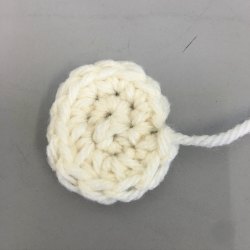
SNOUT
With aran yarn
Round 1: 6 sc into magic ring.
Round 2: 2 sc in each st around – 12 sc.
Round 3: [2 sc in next st, sc in next 3 st] around – 15 sc.
Round 4-5: Sc in each st around.
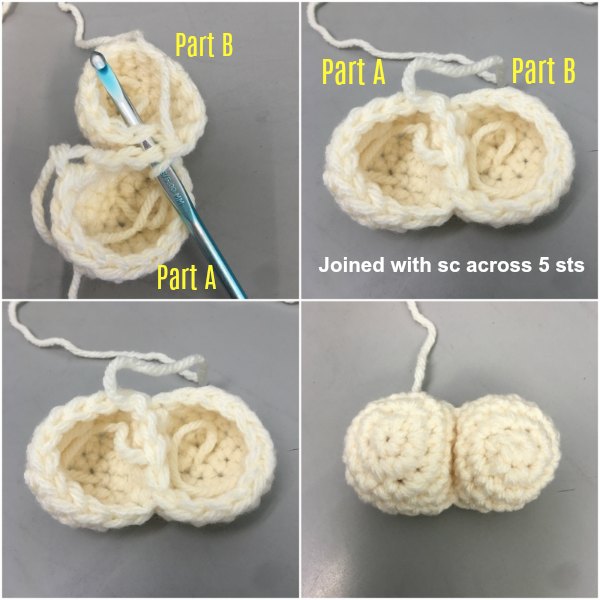
Fasten off. You have just created Part A. Repeat Rounds 1-5 once more to create Part B. Do not fasten off. Join Part A to Part B by joining across 5 sts with sc (or you can just sew together across 5 sts). Fasten off, leaving a long tail. Stuff snout.
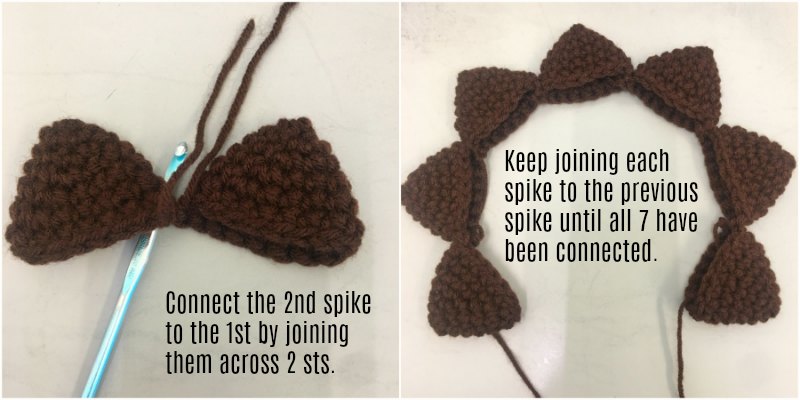
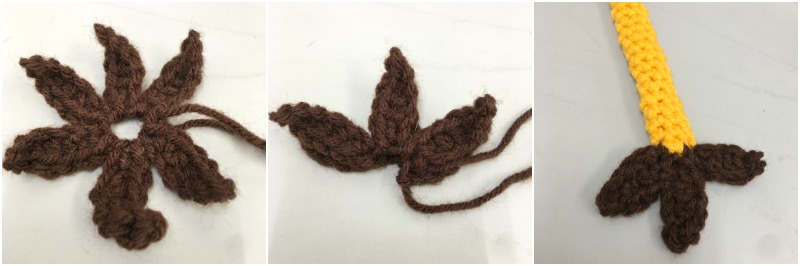
MANE SPIKE (make 7)
With brown yarn
Round 1: 4 sc into magic ring.
Round 2: 2 sc in each st around – 8 sc.
Round 3: [2 sc in next st, sc in next 3 st] around – 10 sc.
Round 4: [2 sc in next st, sc in next 4 st] around – 12 sc.
Round 5: [2 sc in next st, sc in next 5 st] around – 14 sc.
Round 6: [2 sc in next st, sc in next 6 st] around – 16 sc.
Round 7: Sc in each st around.
Fasten off, leaving a long tail. Repeat to make 7 Mane Spikes in total. Connect each mane part to another mane part by joining with sc across 2 sts. Continue to do so until you have connected all 7 parts together. This is now the completed mane. Do not stuff.
EAR (make 2)
Same as Mane above (Rounds 1-7), but in the color gold instead. Do not stuff.
CROCHET LION MANE ASSEMBLY
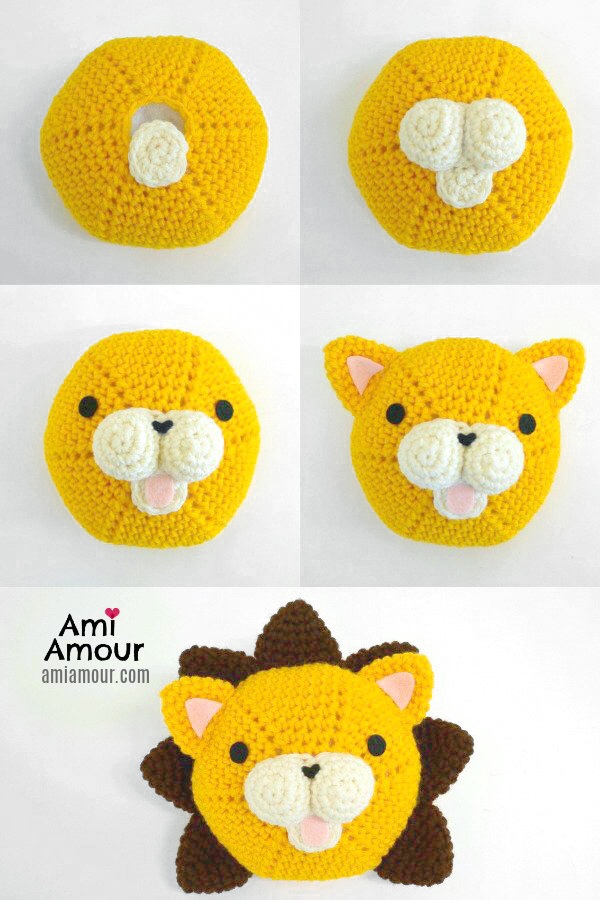
1. Sew Mouth on first and then Snout onto Head. When looking at the Head, you’ll notice the lines of the decreases separates the head into 6 different sections. Use those points as reference when sewing on parts and see photos above for Placement.
2. Cut 2 circles from black felt for eyes. Cut a small triangle for the nose. Cut a tongue piece from pink felt.
Glue with Fabri-tac onto Head (or you can sew on). See photos for placement.
3. Sew ears to Head. Cut 2 triangles for the inner ears. Glue onto Ears.
4. Sew complete Mane Piece to Head.

BODY
With gold yarn
Round 1: 6 sc into magic ring.
Round 2: 2 sc in each st around – 12 sc.
Round 3: [2 sc in next st, sc in next st] around – 18 sc.
Round 4: [2 sc in next st, sc in next 2 st] around – 24 sc.
Round 5: [2 sc in next st, sc in next 3 st] around – 30 sc.
Round 6: [2 sc in next st, sc in next 4 st] around – 36 sc.
Round 7: [2 sc in next st, sc in next 5 st] around – 42 sc.
Round 8: [2 sc in next st, sc in next 6 st] around – 48 sc.
Round 9: [2 sc in next st, sc in next 7 st] around – 54 sc.
Round 10-15: Sc in each st around.
Round 16: [Sc2tog, sc in next 7 st] around – 48 sc.
Round 17-22: Sc in each st around.
Round 23: [Sc2tog, sc in next 6 st] around – 42 sc.
Round 24: Sc in each st around.
Round 25: [Sc2tog, sc in next 5 st] around – 36 sc.
Round 26: Sc in each st around.
Round 27: [Sc2tog, sc in next 4 st] around – 30 sc.
Round 28-30: Sc in each st around.
Round 31: [Sc2tog, sc in next 3 st] around – 24 sc.
Fasten off, leaving a long tail. Stuff Body.
TAIL
With gold yarn
Round 1: 6 sc into magic ring.
Round 2-25: Sc in each st around.
Fasten off, leaving a long tail. Do not stuff.
TAIL END
With brown yarn
[Ch 7, sl st in previous ch, sc in next ch, hdc in next 2 ch, sc in next ch, sl st in last ch] 6 times. Sl st into very first ch made. Fasten off, leaving a long tail.
It’ll look like a six point star. Fold in half. Lay the points atop each other so that you have 3 points. Sew into place. Sew onto TAIL.
ARM (make 2)
Round 1: With aran yarn, 6 sc into magic ring.
Round 2: 2 sc in each st around – 12 sc.
Round 3: [2 sc in next st, sc in next st] around – 18 sc.
Round 4: [2 sc in next st, sc in next 2 st] around – 24 sc.
Round 5: [2 sc in next st, sc in next 5 st] around- 28 sc.
Round 6: With gold yarn, (In back loop only), sc in each st around.
Round 7: [Sc2tog, sc in next 5 st] around – 24 sc.
Round 8: Sc in each st around.
Round 9: [Sc2tog, sc in next 4 st] around – 20 sc.
Round 10-14: Sc in each st around.
Round 15: [Sc2tog, sc in next 8 st] around – 18 sc.
Round 16-19: Sc in each st around.
Round 20: [Sc2tog, sc in next 7 st] around – 16 sc.
Round 21-22: Sc in each st around.
Round 23: Sc2tog, sc in next 14 st – 15 sc.
Round 24-26: Sc in each st around.
Fasten off, leaving a long tail. Stuff Arms.
LEG (make 2)
Round 1: With aran yarn, 6 sc into magic ring.
Round 2: 2 sc in each st around – 12 sc.
Round 3: [2 sc in next st, sc in next st] around – 18 sc.
Round 4: [2 sc in next st, sc in next 2 st] around – 24 sc.
Round 5: [2 sc in next st, sc in next 5 st] around- 28 sc.
Round 6: With gold yarn, (in back loop only) sc in each st around.
Round 7: [Sc2tog, sc in next 5 st] around – 24 sc.
Round 8-12: Sc in each st around.
Round 13: [Sc2tog, sc in next 4 st] around – 20 sc.
Round 14-18: Sc in each st around.
Round 19: [Sc2tog, sc in next 8 st] around – 18 sc.
Round 20-26: Sc in each st around.
Fasten off, leaving a long tail. Stuff Legs.
CLAW (make 12)
With aran yarn
Round 1: 4 sc into magic ring.
Round 2: 2 sc in each st around – 8 sc.
Round 3: Sc in each st around .
Fasten off, leaving a long tail. Do not stuff.
ASSEMBLY
1. Sew Head to Body.
2. Sew Legs to Body.
3. Sew Arms to Body.
4. Sew Tail to Body.
5. Sew 3 claws to each Limb.
6. Sew 25 mm white button onto belly (DO NOT use button if for young kids or babies as it is a choking hazard).
7. Cut and hide all ends.
HOORAY, you’re finished!! Don’t forget to show me your Crochet Lion!
You can tag me with your projects on my Instagram.
12 Comments
Judy Sutton
February 14, 2019 at 12:13 pmI LOVE your patterns!!! You have such a wonderful imagination and sharing your little creations with us is such a kind and generous thing to do!!
Ami Amour
February 14, 2019 at 12:15 pmThanks, Judy! Happy Valentine’s day and I’m so glad you like! <3
Eira
March 11, 2019 at 5:00 amThat is a super cute lion!
I was thinking of making one or two, but I’d like to sell them, how do you feel about other people selling the items made from your patterns? would it be ok for you? I ask because I know there is people who are for and people who are against and I would like to respect you creators.
Thank you for this beautiful patterns 🙂
Ami Amour
March 11, 2019 at 10:51 amHi Eira, you are free to do as you wish with all the creations you make yourself. Thanks for all the wonderful comments!
Angel
February 8, 2020 at 10:14 amSuper cute!! I remember this guy from Bleach! Kon is his name I think. He was kinda annoying but also funny at the same time. I can’t wait to make my own ^^ You are so talented!
Ami Amour
February 8, 2020 at 6:02 pmOh thanks very much! Love to see how he turns out!
Claudia
December 7, 2020 at 4:24 amBonjour, vous êtes un génie ! Kon est magnifique ! Mon fils est fan de bleach je vous remercie pour ce tuto. Merci merci merciiiii
Ami Amour
December 9, 2020 at 8:35 pmYour welcome and I’m so glad you like and hope your son enjoys!
Joanie Cusson
July 29, 2020 at 11:10 pmWOW! I made it for me boyfriend and he just LOVE it !! Thank you so much for this pattern. Incroyable. Did you have also the pattern for the chibi version? I would like to buy it and made him a chibi version as well. 🙂 Thanks !
Ami Amour
July 29, 2020 at 11:33 pmOh that’s fantastic! So glad he was a hit with your boyfriend. The chibi version is definitely on my list of patterns to write up!
Aashi
August 29, 2020 at 7:34 amHow much yarn would I need for this project approximately? Just to make sure I order enough 🙂
Ami Amour
August 29, 2020 at 6:26 pmFor the gold color, you’ll need about 7oz (364 yards) of yarn or less. I used the Red Heart Super Saver yarn, and 1 skein was plenty enough!