
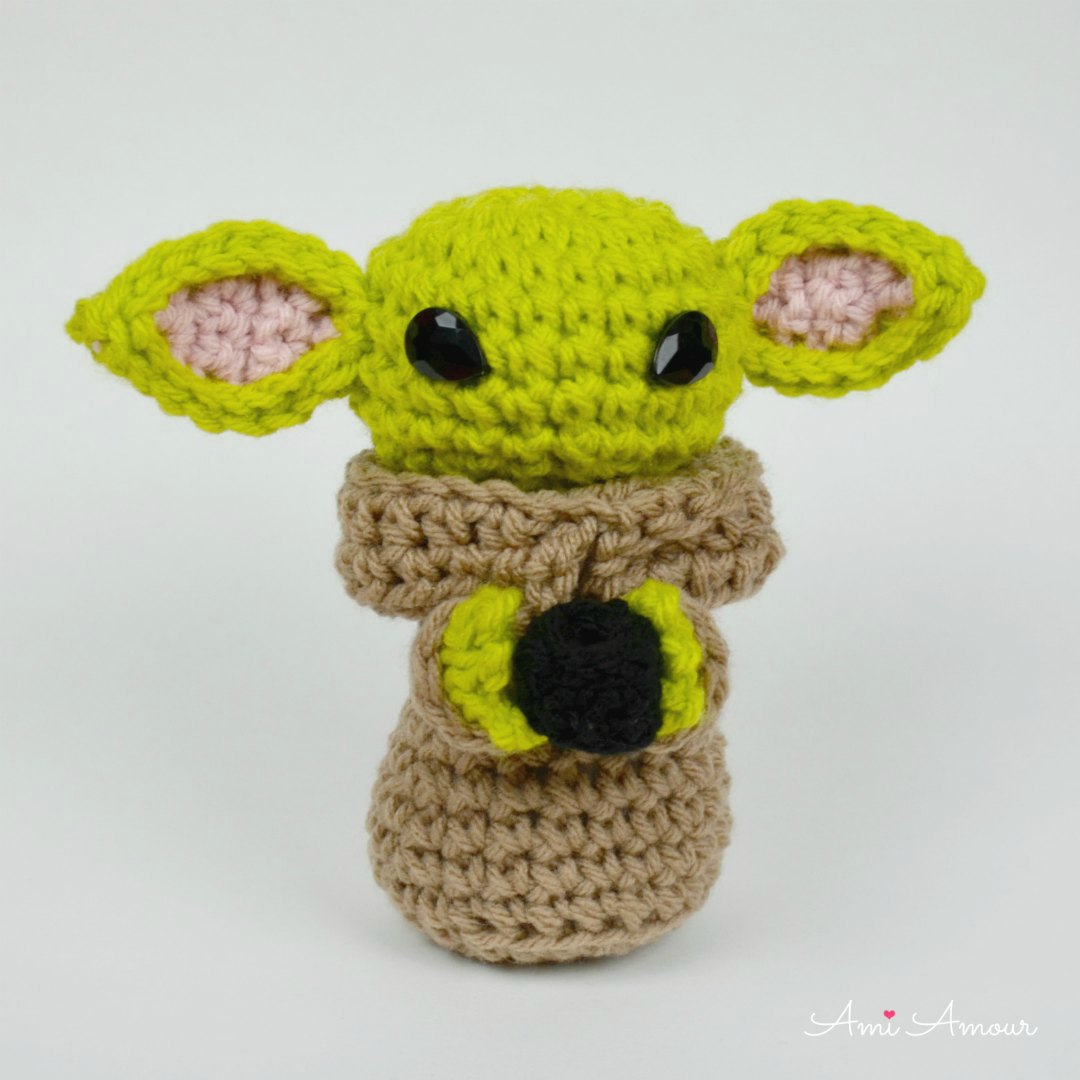
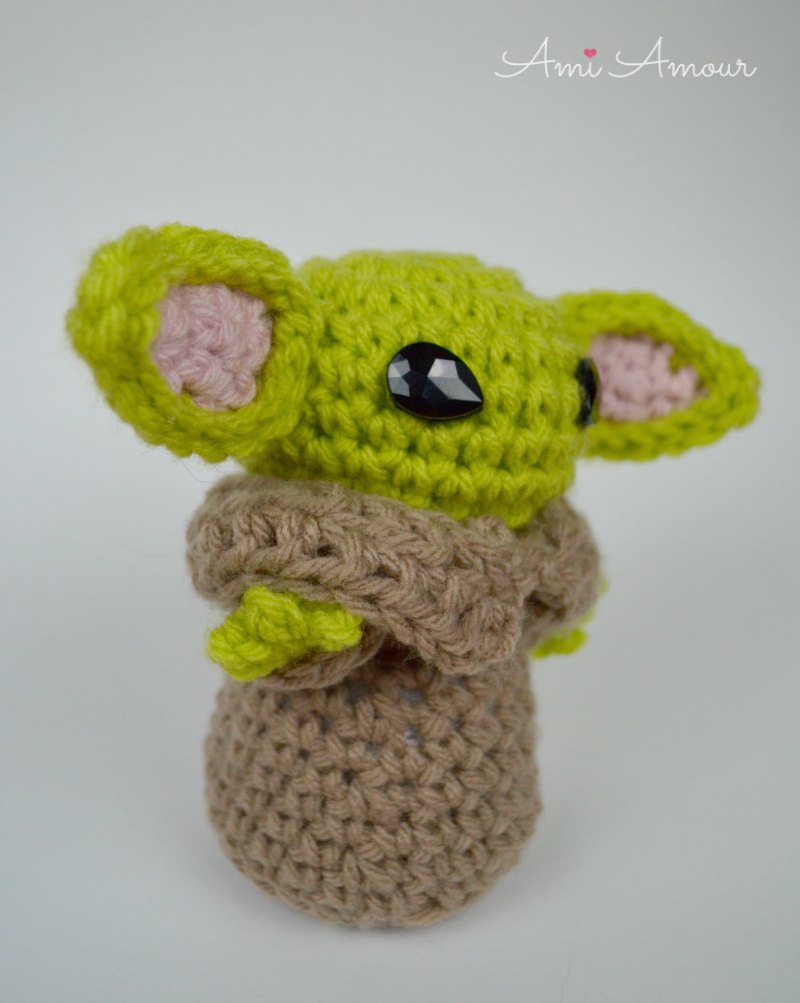
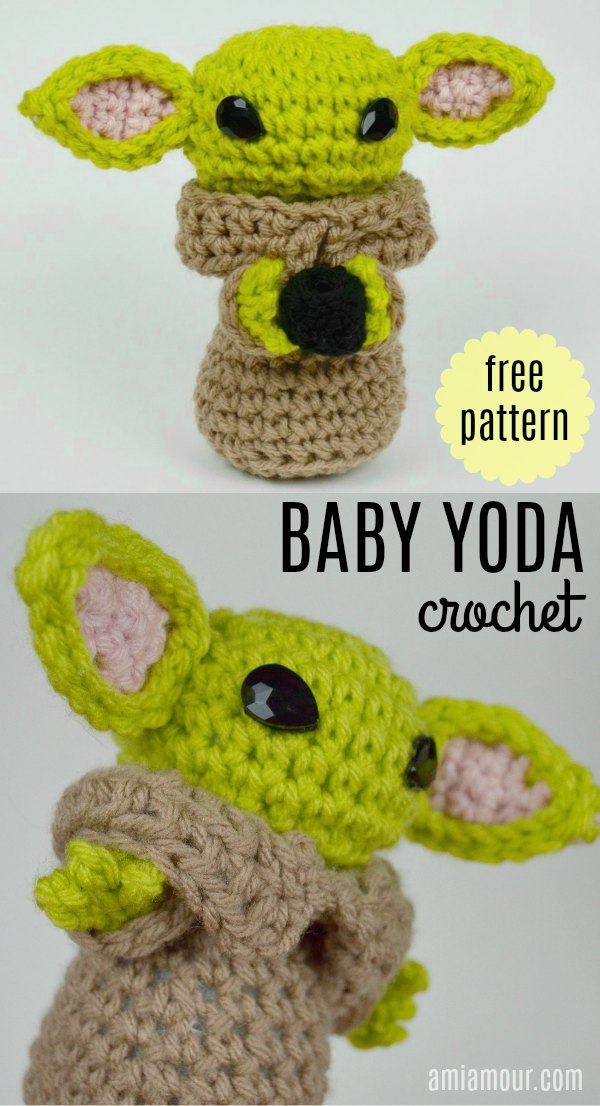
As if everyone didn’t love Yoda already, they had to go and introduce Baby Yoda aka Grogu and everyone on the internet collectively lost their minds in cuteness. So yes, I’m also on the bandwagon and I knew I had to create a Grogu crochet amigurumi version as well!
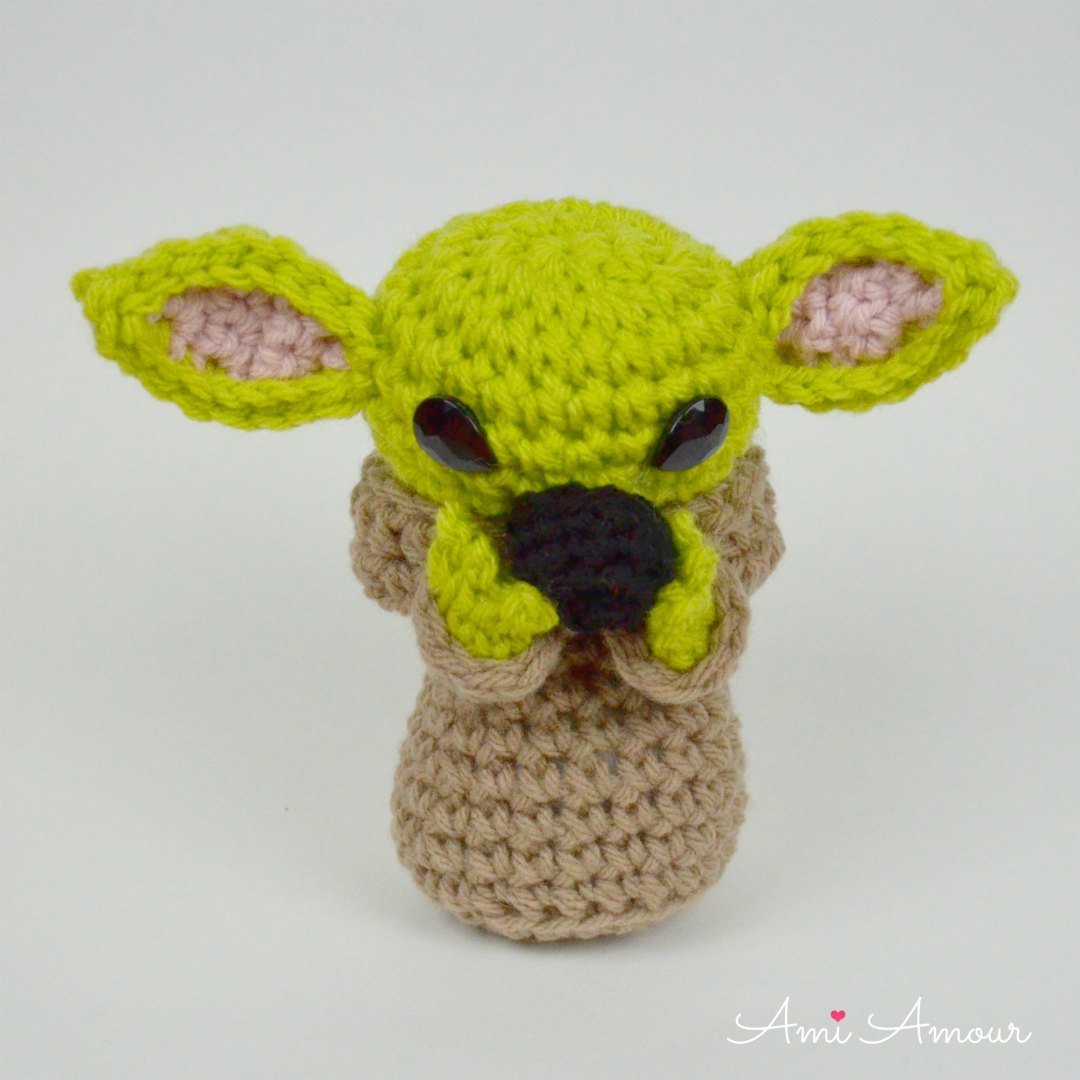
Seeing all the Baby Yoda memes out there, I thought it’d be fun to do a crochet take on them. So when thinking of the different poses for Grogu, I thought immediately first of the sipping soup pose.
Crochet Grogu is just here for the drama. *takes a sip*
The second pose is the one where Grogu tries very hard. This is when Grogu was trying to help the Mandalorian and he uses all his power and strength.
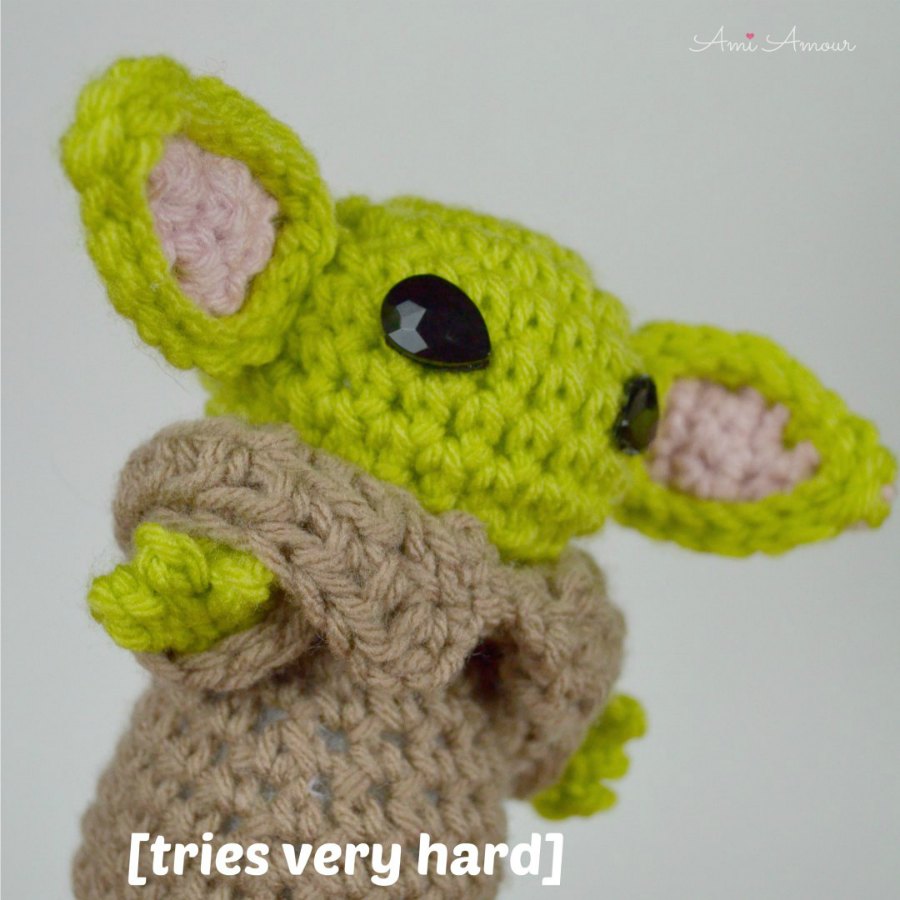
Come to think of it, that kind of feels like me whenever I’m trying to design and get a pattern out. I think I will also need a very long nap now 😛
The features for this free Baby Yoda Crochet pattern include his long pointy ears and his robe with a cowl around his neck. He also has brown sleeves and 3 fingers for each hand. Bonus accessory includes a cup to sip while watching the drama.
Another special feature for him is his eyes. His eyes are so distinct and translucent, so I thought that acrylic gems were the way to go! I found some tear shaped ones and glued them on.
When I was designing Grogu, I kept thinking he looked a lot like Stitch (from Lilo and Stitch) They have similar eye shapes and long ears! Also, I kept thinking DO NOT make him look like those green aliens with oval heads and eyes. I told my friend this and he said, “Well, he is an Alien.” I guess technically it is true, but you know what I mean!
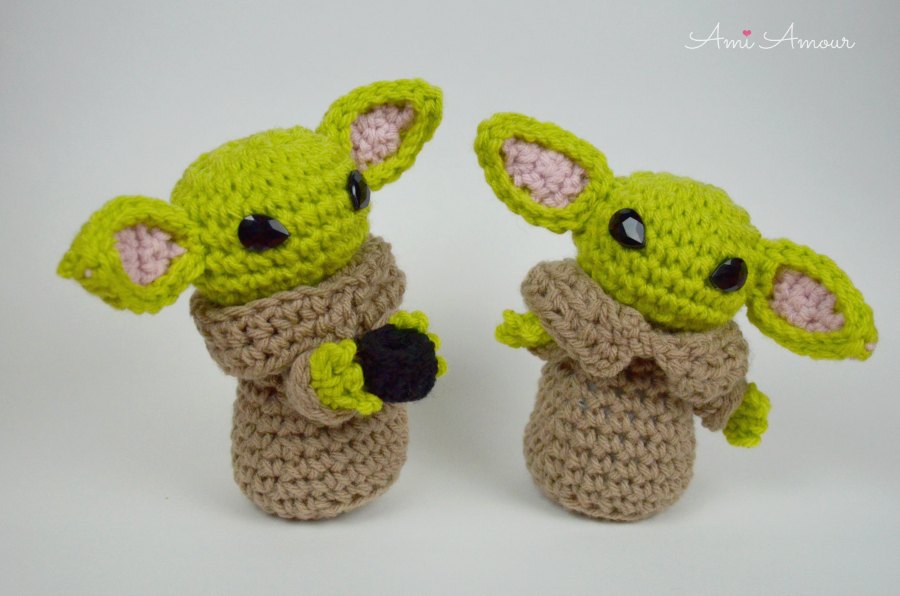
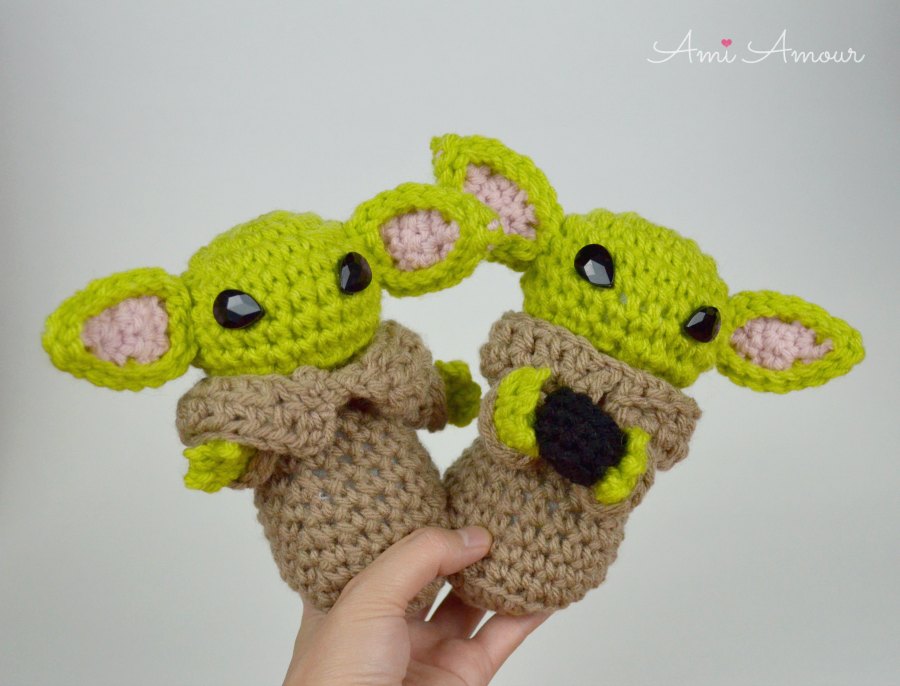
Fun thing about this pattern is that by changing the placement of where you sew the arms, you can change memes in an instant! If you sew the hands to the sides, you’ll get a standalone Crochet Baby Yoda. If you sew the hands in the center of the robe, then you can sew the cup in between the hands to create the iconic sipping soup pose.
You can also crochet him a Space Pod cradle accessory!
So, I hope you’ll enjoy this free crochet pattern and “May the Cuteness Be With You!”
If you do make this amigurumi pattern, please do tag me with your project on my Instagram, as I’d love to see!
Make sure you subscribe to my blog to get all my latest pattern updates!
Here are some other free crochet patterns you may enjoy!


Disclosure: This post contains affiliate links. This means I may receive a small commission if you decide to purchase anything by clicking on one of these links.
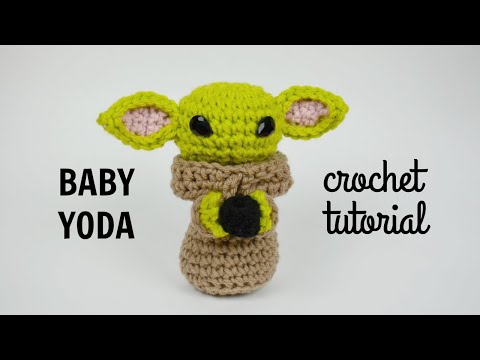
Crochet Baby Yoda Video Tutorial
See Baby Yoda in action and crochet along with me!
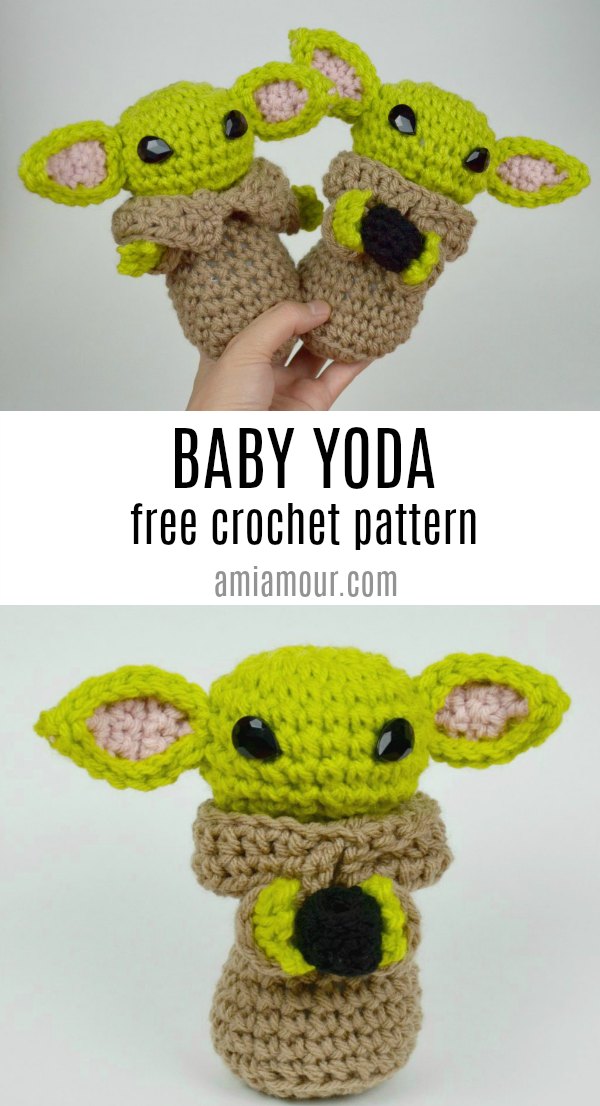
Grogu – Baby Yoda Crochet Amigurumi Pattern
LEVEL: Intermediate
CROCHET HOOK: 5.00mm hook
YARN:
Impeccable Loops and Thread Yarn
– Grass
– Soft Taupe
– Soft Rose
– Black (small amount for the cup)
NOTIONS:
Teardrop Black Acrylic Gem: size 13mm x 18mm (2 for the eyes)
Black Felt
Polyester Fiberfill
Yarn Needle
Stitch Marker
Scissors
Fabri-tac Glue
SIZE:
Approximately 5 in/13cm tall
HEAD
With green yarn
Round 1: 8 sc into magic ring.
Round 2: 2 sc in each st around – 16 sc.
Round 3: [2 sc in next st, sc in next st] around – 24 sc
Round 4-7: Sc in each st around.
Round 8: [Sc2tog, sc in next st] around – 16 sc.
Round 9: Sc2tog around – 8 sc.
Round 10: Sc in each st around – 8 sc.
Fasten off, leaving a long tail.
EAR
With pink yarn
Row 1: Ch 2, sc into 2nd ch from hook – 1 sc.
Row 2: Ch 1, turn, 2 sc in st – 2 sc.
Row 3: Ch 1, turn, 2 sc in next st, sc in next st – 3 sc.
Row 4: Ch 1, turn, 2 sc in next st, sc in next 2 st – 4 sc.
Row 5: Ch 1, turn, sc in each st across – 4 sc.
Row 6: Ch 1, turn, skip first st, sc in next 3 st – 3 sc.
Row 7: Ch 1, turn, skip first st, sc in next 2 st – 2 sc.
Fasten off, leaving a short tail.
Repeat Row 1-7 again but with GREEN instead and DO NOT FASTEN OFF at the end.
Lay the Pink Ear on top of the Green Ear. Now we will sew both the ears together with sc around the border of both layers. See photos below for reference.
On the first length of the ear, you will do sc border across. When you get to the tip, 3 sc in the same stitch, and then continue to sc across the other length of the ear.
Then you will do a sl st border around the ear.
Finished Ear. Make sure to make 2 Ears!

BODY
With brown yarn
Round 1: 6 sc into magic ring.
Round 2: 2 sc in each st around – 12 sc.
Round 3: [2 sc in next st, sc in next st] around – 18 sc.
Round 4: [2 sc in next st, sc in next 2 st] around – 24 sc.
Round 5: In back loop only, sc in each st around – 24 sc.
Round 6: Sc in each st around – 24 sc.
Round 7: [Sc2tog, sc in next 6 st] around – 21 sc.
Round 8: Sc in each st around – 21 sc.
Round 9: [Sc2tog, sc in next 5 st] around – 18 sc.
Round 10: Sc in each st around – 18 sc.
Round 11: [Sc2tog, sc in next 4 st] around – 15 sc.
Round 12: Sc in each st around – 15 sc.
Round 13: [Sc2tog, sc in next 3 st] around – 12 sc.
Round 14: [Sc2tog, sc in next st] around – 8 sc.
Round 15: In Front Loop only, 2 sc in each st around – 16 sc.
Round 16: [2 hdc in next st, hdc in next st] around – 24 hdc.
Round 17: Sc in each st around – 24 sc.
Note: We will now start working in rows.
Row 18: Ch 2, turn, in Back Loop only, hdc in each st around – 24 hdc.
Row 19: Ch 2, turn, Hdc in each st around – 24 hdc.
Row 20: Ch 2, turn, in back loop only, hdc in each st around – 24 hdc.
Fasten off, leaving a long tail.
Tuck the last round underneath the previous round and sew down.
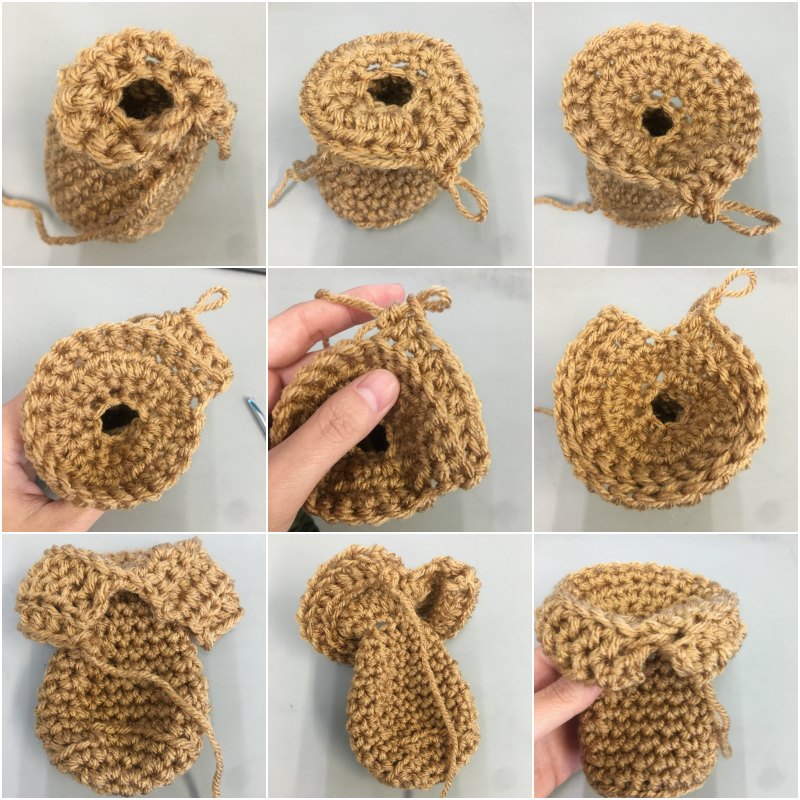
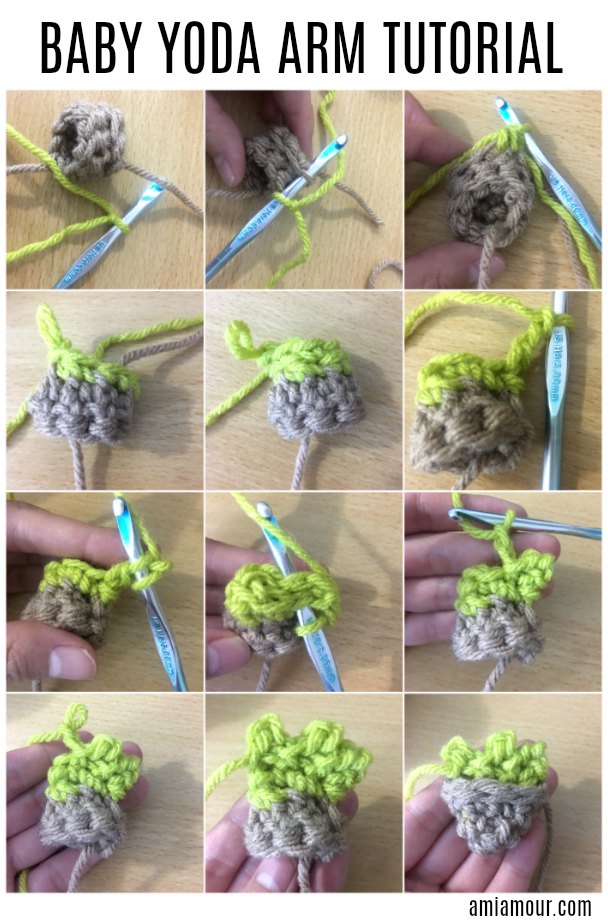
ARM SLEEVE
With Brown yarn
Round 1: 8 sc into magic ring.
Round 2: Sc in each st around – 8 sc.
*Round 3a: In Front loop only, sc in each st around – 8 sc.
Sl st to join to next st.
Fasten off, leaving a long tail.
HAND
Flip the ARM SLEEVE inside out so that you can see *Round 3 with the Back Loop. See first photo in tutorial below.
We will work with green yarn now into the back loop. Sl st to join into one of the stitches on the back loop from Round 3. See photo tutorial below for reference.
Round 1: [Sc2tog, sc in next st] around – 6 sc.
Round 2: Sc in each st around – 6 sc.
Row 3: Ch 2, sl st into first ch, flatten the hand so that the layers lay on top of each other. Sl st through both layers, ch 2, sl st into first ch, sl st through both layers, ch 2, sl st into first ch, sl st through both layers. [See photo tutorial below]
Fasten off, leaving a long tail.
CUP
With black yarn
Round 1: 5 sc into magic ring.
Round 2: 2 sc in each st around – 10 sc.
Round 3: In back loop only, sc in each st around – 10 sc.
Round 4: Sc in each st around – 10 sc.
Round 5: Sl st in each st around – 10 sl st.
Fasten off, leaving a long tail.
Weave in ends.
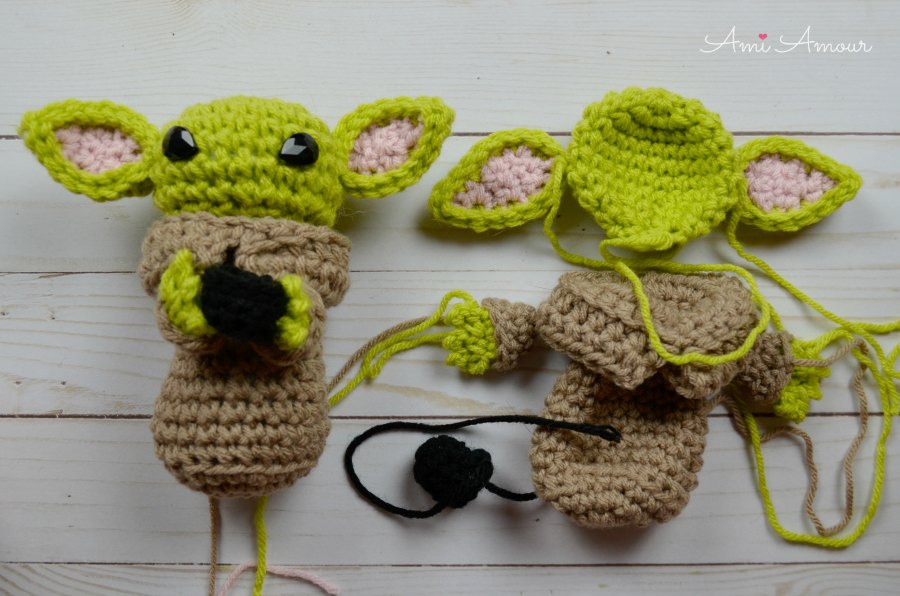
GROGU AMIGURUMI ASSEMBLY
1. Stuff the Head and Body.
2. Sew Head onto Body.
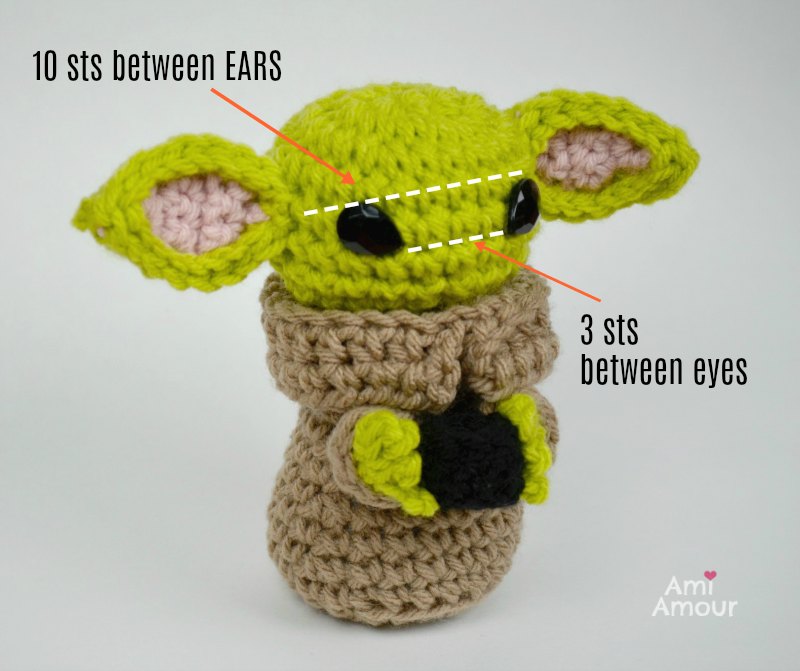
3. Sew Ears onto Head. Ears should be spaced with 10 sts across face.
4. With tear shape acrylic gem, use as template to cut out black felt. The size for the gems should be 13mm x 18mm.
Glue black felt on with Fabri-tac onto face. Eyes should be spaced with 3 sts in between.
Glue acrylic gem with Fabri-tac on top of black felt. [The felt creates a nice even surface for the gem to be glued on]. DO NOT USE the acrylic gems for young children as they can be a CHOKING HAZARD.
5. Sew Arms to Body. Placement can be on side of arms, like this. Or if you are making the Baby Yoda Sipping Tea MEME look, sew the arms in the center of the body 3 rounds and with enough room to grip the CUP. Then sew in Cup between the fingers.
6. Make sure you crochet your Baby Yoda a Space Pod (also a free pattern on my blog), so he can travel around in style!
7. Tag me with your project on my Instagram or Facebook!
14 Comments
Amanda
December 27, 2019 at 1:04 pmHe’s too cute!!! ? I’ll try to make one as soon as I can! May the Force of cuteness be with you!
Ami Amour
December 27, 2019 at 1:52 pmMay the Force of cuteness be with you too! I can’t wait to see!
Alida Ryerson
January 5, 2020 at 6:51 pmI just finished the Yoda pattern, very cute!
Than you for the video….the crochet stitches were easy to follow but the video really helped with the “folding and ” 🙂
Just one bit of confusion on the sleeve….the written pattern says back loop but the video says front loop. It was easier with front loop.
Thank you for your effort and creativity.
Ami Amour
January 6, 2020 at 2:24 pmGlad the video helped and thanks for catching that on the written pattern. I’ve changed it to say Front Loop! Would love to see how your Yoda turned out!
Marie
April 10, 2020 at 6:52 pmDo you really mean for the acrylic gems to be 25 x 18 mm? I went in through your link, they’ve come today and they are HUGE. Is this right? Thank you
Ami Amour
April 10, 2020 at 8:35 pmI’m so sorry, I just checked the acrylic gem size and it should actually be 13 x 18 mm size. I’ve updated the links in the post and also have written out the size in the Supplies section now. Thank you for catching that.
Marie
April 10, 2020 at 9:11 pmThank you! I’ve made a note on my pattern too
Nicole
May 21, 2020 at 5:12 amHi – i just love your designs !!! Thank you for sharing. Can you help me understand the yoda hand design i cant figure it out
Ami Amour
May 21, 2020 at 4:03 pmHi Nicole, did you get to see my video tutorial for the pattern? It’s attached in the post. But you can also go to the timestamp here to see and follow along how I do yoda’s hand: https://youtu.be/WAoGddSq4XQ?t=735
Michele
June 19, 2020 at 5:50 pmLoved the video and pattern. Very easy to follow, thank you!
Ami Amour
June 19, 2020 at 6:04 pmYour welcome! Glad you enjoyed it!
Andrea Staniforth
October 31, 2020 at 8:55 amWhere are the written patterns please. I just can’t find them. Thank you
Ami Amour
November 2, 2020 at 10:52 amHi it’s in the post above. The written pattern starts after the video tutorial image on this page and the materials needed. Hope that helps!
Alice
May 5, 2021 at 1:03 pmI made this today for my nephew (10 yrs old) he watched me make it. He loved it. Thank you so much for the pattern!!